
Building a custom renderer for Unity - Directional Shadow Rendering
When rendering (real-time) shadows in a scene, they're are grouped into two categories. Directional Shadows are suitible for lights representing the sun and will cast shadows for objects marked as a shadow caster and render shadows on objects in the scene marked as a shadow reciever within a predefined 'max shadow distance'.
Punctual Shadows are shadows that are cast from punctual lights like Point Lights and Spotlights. Both need to be tackled differently and frankly I don't really know how punctual shadows exactly work yet but I did implement directional shadows in my custom renderer so here I'll be discussing the things I learnt about realtime directional shadows.
I'll be calling the directional light in the scene the sun from now on even though you can have multiple directional lights in the scene
It personally helped me to break it down by thinking 'what actually is a shadow'. A shadow is what you get when the a light source can no longer directly see a surface because something is blocking it.
We already have the capacity to know what objects block other objects in rendering by using a depth buffer (also known as a z-buffer). When you render an object as an 'Opaque' then it is also being drawn to the cameras depth buffer, this is done so when the final render happens we don't waste time drawing to the same frame buffer position multiple times where we might have overlapping geometry. Overwriting the frame buffer data multiple times is known as 'overdraw'.
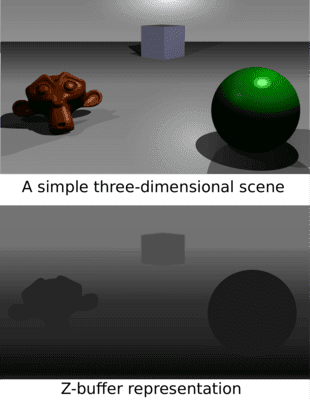
If a shadow is what you get when the sun can't see an object because another is blocking it, what we need is a depth buffer but from the perspective of the sun, rather than the camera. There's a lot of math that goes into actually figuring out the position that the depth buffer should be rendered from so I recommend actually just looking at the full tutorial if you're interested.
Shadow Atlas
A shadow atlas is just the label that we assign to the depth buffer storing our shadow data. In order to write data to the atlas a specific ShadowCaster shader pass needs to be performed. The point of this pass is two-fold, it means that we have seperated the idea of something being drawn in the final output and it's ability to cast shadows, and it means we can populate the atlas with the correct data.
A 'pass' is when you go over objects in the scene, for some reason I imagine it a bit like passing my hand over the whole screen, if I have multiple passes then I do it multiple times (in my head definetely not in real life).
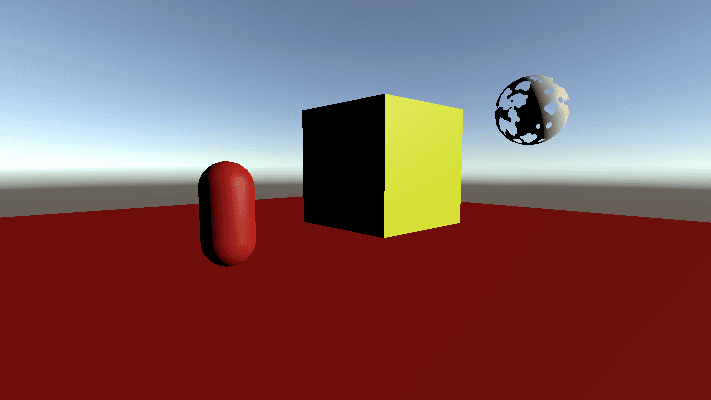
To demonstrate what this looks like I'm going to bring back the three amigos
A shadow atlas is just a render texture, so we can configure the resolution and raise it which will make the shadows sharper but will also increase the memory used. In order to actually draw shadows in the scene each shadow reciever in the scene will need to sample the shadow atlas at the position that it maps to. In the tutorial this is referred to as a view space to shadow texture space transformation. This is done to see if the fragment should be the correct surface color or if it should be shaded and some attenuation needs to be added.
I'm not going to explain the math that goes into how the shadows are actually rendered because I've also not described how the lit shader in this scene even works which is a pretty key component. The shadow map is sampled by each object and where it knows there is an object in front of itself it can attenuate the amount of light that should be shown on the surface where attunuation of 1 is no shadow (surface color) and 0 is full shadow (black).
Cascades
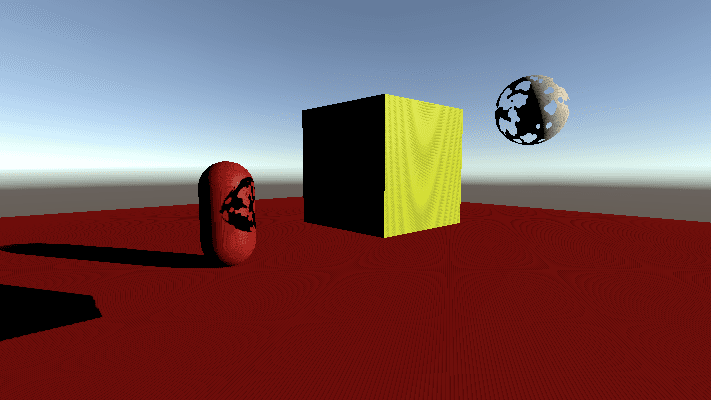
When above I mentioned that you create a depth buffer from the perspective of the sun? It doesn't really make sense because directional lights in Unity don't have a source position, they're infinite, so we pick a distance to render from. An issue of this approach though is that the further away you are, the less definition you will have on your shadows because they will occupy less pixels in the atlas. You can see the effect this has in the scene below.

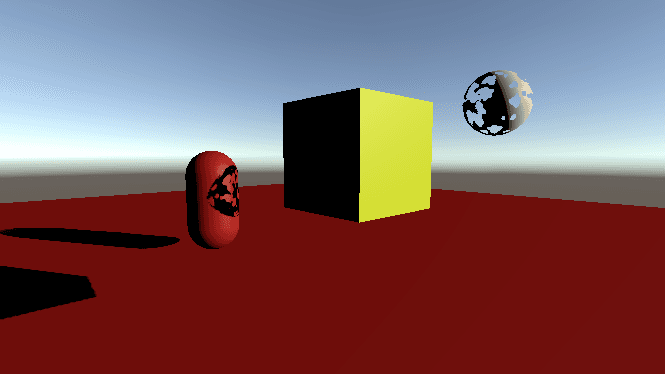
If we change the distance that we render the shadows from to be closer to the objects in the scene then this is the result we get.
The way to solve this is by using Shadow Cascades which is a technique where we perform our shadow pass multiple times with different max distance values and then blend the shadows in the scene based on their proximity to the camera. The closest shadows can be sampled from the lowest max distance cascade but further objects are sampled from cascades with higher max distances.
This technique works well when combined with some sort of blending for shadows that are on the border of a cascade so you don't get a really harsh line where the shadow clearly improves/deteriorates in resolution. Most games I've seen have used four cascades but because you're rendering the shadow map four times it can have a significant impact on render time so reducing the cascade count can be necessary.
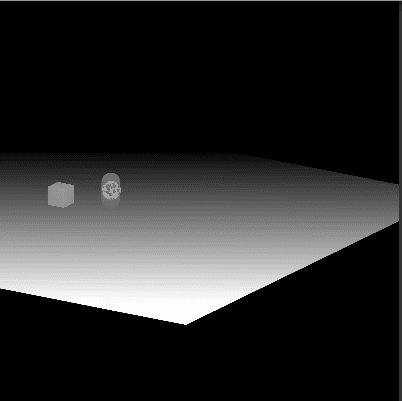
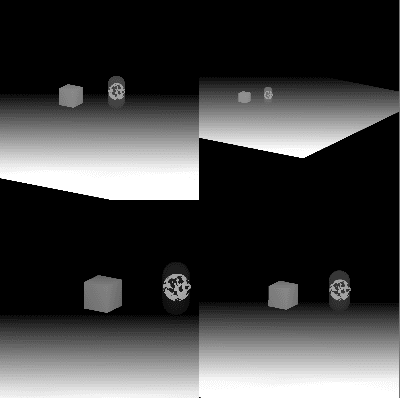
Here is what the shadow atlas looks like for this scene when we're rendering all four cascades.
So long as you can afford the performance and tweak the values to be suitable to the level being made then this resolves the shadow distance resolution issues.
Shadow Bias
This is something I had no idea about before I implemented this in the custom SRP, it was very easy to implement but quite hard for me to get my head around.
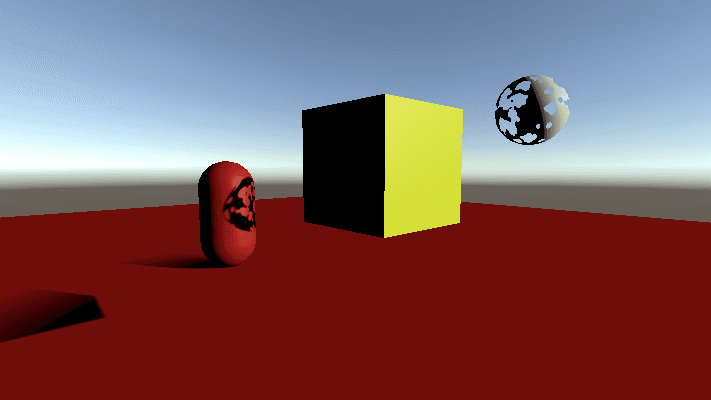
Everytime I've shown a screenshot of my fully rendered scene I've been showing it with a 'depth bias' being applied. This is what it looks like if I remove this bias.
This is known as Shadow Acne and it happens when a surface isn't perfectly aligned with the light i.e. not perfectly parallel. Some fragments will fail the depth test to see if they should be shaded or not due to floating point errors when comparing the texel depth from the perspective of the camera and the texel depth from the perspective of the light.
The fix for this is to add a bias that gets applied at the point where the shadow atlas is being rendered that effectively offsets all of the values so that these comparisions are less likely to fail.
When adding a bias it's important to not be too over zealous with the parameters as you'll cause what's known as Peter Panning where the shadow looks as though it's become detached from the object that should be casting it.
Biases are configured per light as different scenes will have different requirements, it is worth playing with these values when you feel as though there are shadows being cast when there shouldn't be or shadows aren't correctly attached to their casters.
Once again there's lots more details that I could go into about this but you should just do the tutorial if you want to know more.
Conclusion
That's not actually everything, I didn't mention how to handle multiple directional shadows, shadow filtering, cascade blending techniques, different shadow bias techniques etc. This post does have to end eventually though and I'm satisfied that if you read this and are intrigued then you would benefit more from just doing the tutorials rather than reading my CliffsNotes version of them.